While the COVID-19 pandemic is still not over the industrial world is returning to normal as long distance flights become more populated with travellers. It has been at least two years since I've photographed any trains, let alone done any railfan trip planning, so now is the time to get back to it.
Over the years my process has evolved to organize and schedule a railfan trip, it being best to plan ahead, so here are some of the things to consider when planning a trip which will benefit you at your destination.
The first thing one needs of course is a location. Where would you like to go, what would you like to see and photograph? Once a location is chosen there are a number of factors to consider. Time, how much time do you have to spend on a trip? And... how much money are you willing to fork over? On past trips I have been to Europe and Britain and the cost is a big factor which determines the length of a stay. The advantage to Europe and Britain are that they contain many heritage railways located fairly closely to each other, not like North America, where there can be large distances between heritage lines. As a result, for the price of a visit, one can see more railways in a short time.
Once you decide where/what you'd like to visit you'll need to gather data about the railway, its timetable, and terrain. North American freight trains don't travel to a schedule, or least not one apparent to the railfan, so photographing is generally a hurry up and wait process. A scanner with the railroad's frequency is a handy tool. With passenger trains it's a little easier to estimate when they may appear if you have their current timetable, excluding VIA Rail, unfortunately.
When it comes to timetables heritage railways run to a timetable so it's predictable when they will be at a particular location so you may catch a photo. The tendency for them is to operate mainly on weekends and holidays so some may not run during the week, or certain months of the year. Now, with the internet, it's very easy to look up heritage railways to learn what months, days, and hours they operate, since everyone has a website these days.
Once you know where you're going, and what times are best for photography, the next question is where are the best locations for a photo?
If you've never been to your chosen part of the world before here's where Google Maps are a great help, in several ways. Firstly, with Google maps and satellite images you may locate any railway in the world. Once you have picked your railroad target follow along its route looking for obvious photo locations, such as crossings, overhead bridges, stations, and other points that seem a likely photo spot. You can zoom in and out as you search. While this works it can be deceiving sometimes. What appears to be a good photo location may sometimes be blocked by something their two dimensional map doesn't show. Elevations are not apparent.
Below are some examples of how to manipulate Google Maps. You can see the result of such searches on the Railfan Plan found on the next page (Click the Plan button above.):
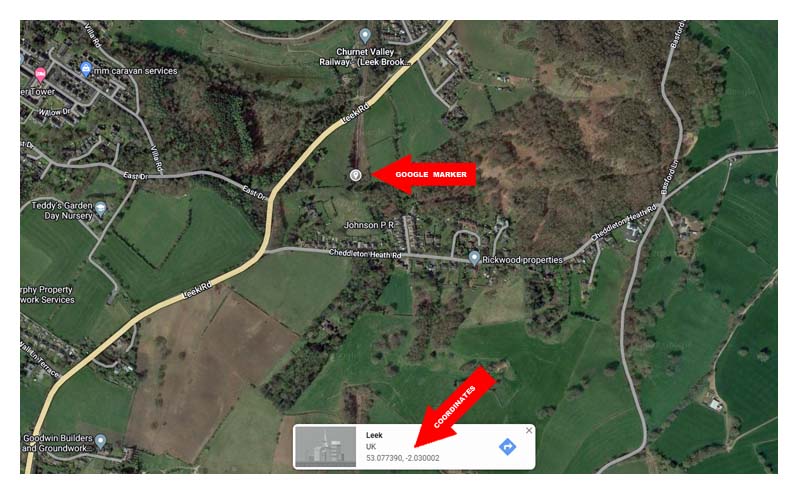
When you find a probable location click on the map and Google software will place a marker there with a dialog box below indicating the latitude and longitude coordinates. All you need to do is transfer those coordinates to your GPS vehicle navigation system and you're on your way to getting there for that perfect photo.
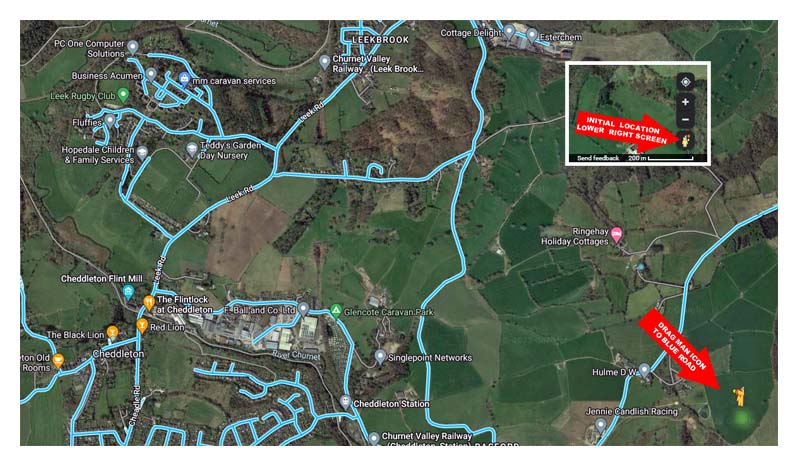
Google Maps has another feature which is very helpful, Google Street View. They have very thoughtfully sent their specially equipped vehicles with a roof mounted 360 degree camera driving around the world. The number of miles covered must be phenomenal. In many cases the roads photographed by their cameras parallel or cross railways. To see what their cameras have recorded open Google Maps in your computer and look for the small man icon in the lower right corner of the screen. With your mouse click on it and drag the icon. As it starts to move various roads will light up in a blue colour:
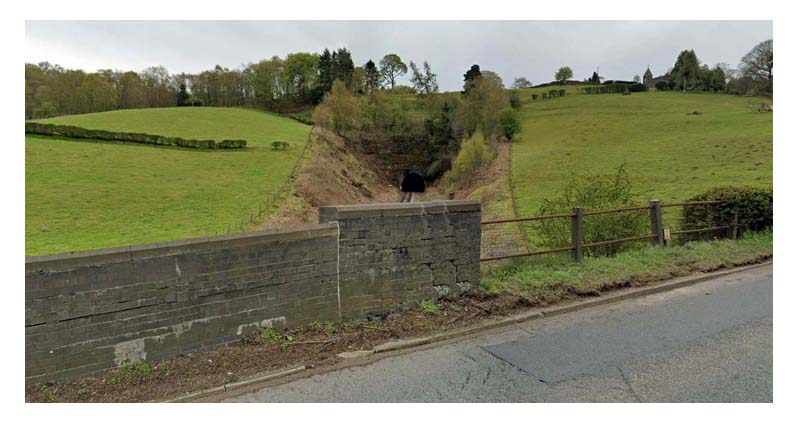
Wherever you next drop the icon on a blue road the Google vehicle's 360 photo appears at that location. You may rotate it 360 degrees or move along the route by using the arrows which appear at the bottom of the photo. In our example here the initial target in Figure 1 was the north portal of a tunnel at coordinates 53.077390, -2.030002. When the man icon is dropped on the blue road above the Google marker at the tunnel the following photo may be viewed:
This may seem like a complex procedure but you'll get comfortable using it very quickly. The more you search this way the more you can see and learn about your chosen area of the world. It is very helpful in determining a possible location for a photo. Now you'll have to wait and see if I can catch a photo of a steam locomotive coming out of that tunnel this September. (With my luck I'll pooch the shot.)
Stay safe out there and don't trespass, it's dangerous, let alone the huge fine.
The next page of this presentation contains an itinerary of my planned trip to England this fall. It's arranged as a calendar with coloured buttons which open more pages containing data and photos. Most of which were obtained from Google Street View and give a glimpse of what one might expect when visiting. I have not visited any of these locations previously but will hopefully arrive, photograph, and then create future website articles from collected photos.
Oh... and don't miss out, take a break and visit some other attractions while you're out there railfanning.
